Our Sedona, Arizona Hikes 2023
Our Sedona hikes took place throughout a one month stay in Camp Verde, AZ. We chose this location to allow us easy access to the entire area. The town of Camp Verde was a few minutes away, Cottonwood about twenty minutes, and Sedona depending on traffic was a thirty minute drive. Flagstaff, Payson and Prescott were easily reached in around an hour.
There are many State Parks, National Forest, Wilderness , Recreation and, Monument Areas, as well as BLM and other protected lands. We enjoyed exploring the variety of hiking trails throughout the entire Verde Valley area. We completed many hikes but, we barely scratched the surface. It was fun to intermingle the iconic social Sedona hikes with the lesser traveled serene trails we discovered.
Our list below provides trail lengths and elevation gain, as well as parking locations. I provided basic trail information based on our experience. This information is not intended to be used as a trail guide, there are many great apps available which we rely on for this, Alltrails https://www.alltrails.com/, Trail forks https://www.trailforks.com/, Avenza Maps https://www.avenza.com/avenza-maps/, and Komoot https://www.komoot.com, are just a few. Enjoy!
Our Top Picks
Most Difficult: Bear Mountain
Most Exposure: Hangover Trail
Favorite Water Hike: The Crack
Favorite Iconic Place: Subway Cave
Easiest Trail: Fossil Creek
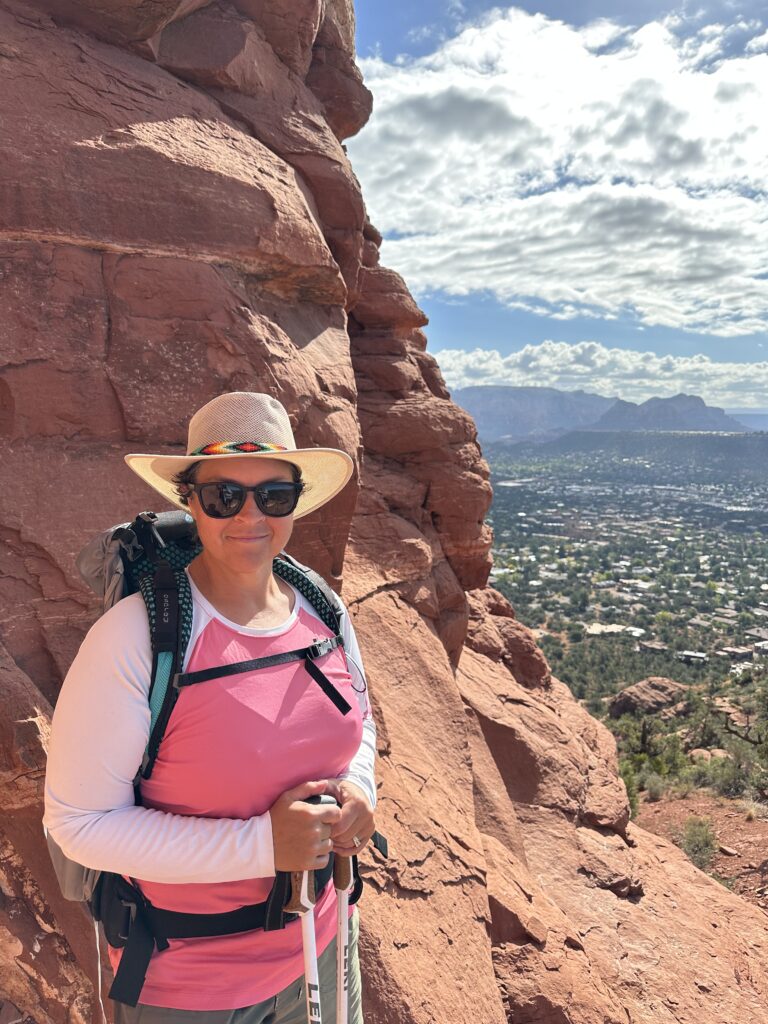
Soldier Pass Spur – Sedona
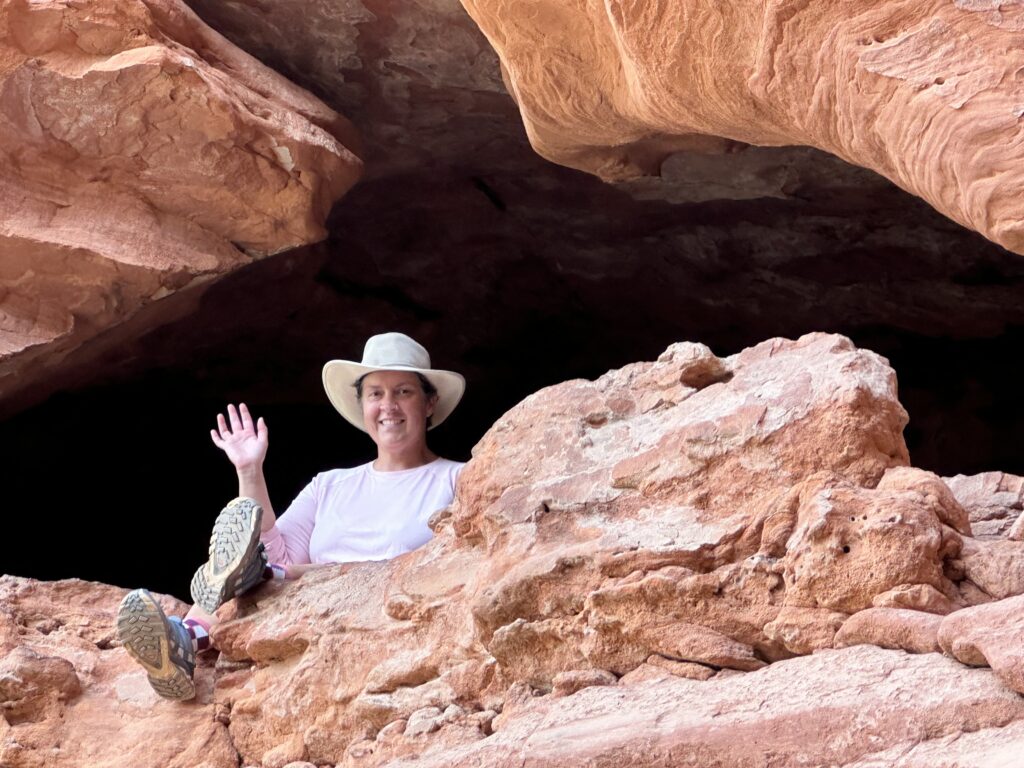
Soldier Pass Trail has a lot to offer with minimal exertion. The trail is a 2.4 mile out-and-back hike with 541′ elevation gain. The parking area is very small and was full by 7:30am on a Monday morning. The area is serviced by the Sedona Shuttle https://sedonashuttle.com Thursday-Sunday. We found additional free parking at the local Posse Ground City Park about a mile from the trailhead.
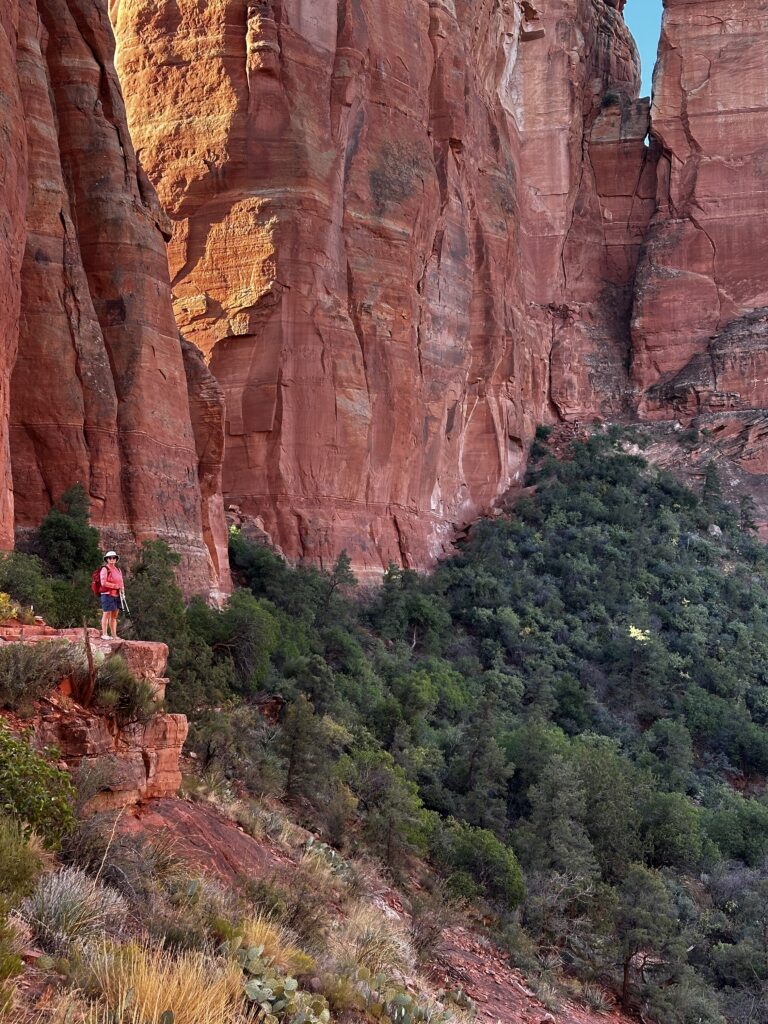
Soldiers Pass Trail leads to a Spur trail which accesses the Cave, the primary destination of many hikers. There are multiple interesting formations along the way. Devil’s Kitchen Sinkhole is an incredible example of a local sinkhole. Next we explored the Seven Sacred Pools, which is a series of basins descending in size as they follow a crevice along the canyon. When we arrived at the spur we hiked up a steep rocky trail to the caves.
The cave’s entrance was a short hand over hand slick rock climb up a chimney. Once inside there was a cooperative effort to move around with other visitors, on narrow cat-walk ledges lining both sides of the cave. Jess was able to make her way to the cave’s window, while I positioned myself outside to take a picture. Combined with the variety of cactus and junipers this was a fantastic Sedona hike.
Hangover Trail via Munds Wagon & Cow Pies Trail – Sedona
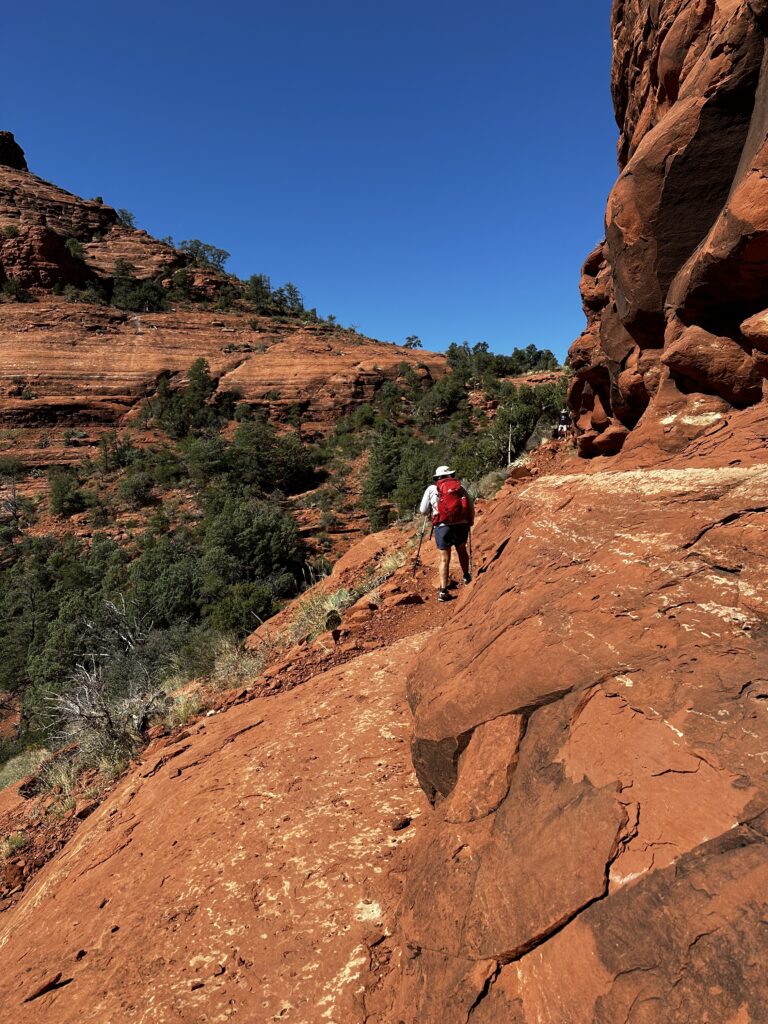
Hangover trail via Munds Wagon & Cow Pies trail was an absolute surprise! We parked at the lot on Schnebly Hill Road, which requires a Red Rock Parking Pass https://www.fs.usda.gov/detail/coconino/recreation/?cid=stelprdb5416207, America the Beautiful Pass https://www.nps.gov/planyourvisit/passes.htm is also accepted. The trail descriptions detail it as a challenging 8.2 miles with 1181” of elevation gain.
The beautiful views from this trail started immediately. The first part of the hike began like any other single track trail with some ups and downs and red rock. At the beginning of the loop portion of the trail, we decided to hike clockwise as many reviews had suggested. It was the best decision we made. The trail narrowed and became sloped red rock with increasing steep distances to the bottom of the canyon.
As we approached the saddle around Pointed Dome the intensity of the climb continued to increase. The higher we climbed the steeper the red rock became. At this point we were hundreds of feet above the canyon and the only thing keeping us on the trail was the friction of our shoes. Just below the dome the hangover trail began an almost level traverse to a saddle on the far side of the Teapot formation. This section of trail was single track width, with a sheer drop-off to the canyon below and an overhanging ledge above our heads.
The descent was beautiful red rock slabs following faintly marked white dashes. This loop trail contained the longest amount of consistent exposure we had ever experienced. Several miles of this hike were no fall territory. I would not recommend this hike if you are unfamiliar with exposure, however if you are not afraid of heights this is one of the best!
Fossil Creek Falls – near Strawberry, Arizona
Fossil Creek Falls is an incredible oasis in the Tonto National Forest. Access to Fossil creek is an arduous drive, along fifteen miles of wash boarded forest service road #708. A high clearance vehicle is not necessary, we easily made it with our Subaru Crosstrek. Printed permits are required, to drive to the trailhead from April 1st-October 1st. Permits are available at: https://www.recreation.gov/permits/251863.
Fossil Creek is an easy 2.6 mile out-and-back trail to a stunning waterfall. There are many places along the trail with easy access to the bright blue waters of fossil creek. There were several small falls along the walk all worth a stop to explore. The amount of fossils in the main falls area was incredible. We encountered many families packed to spend the day picnicking and swimming.
The Fossil creek trail was easy to follow and had very little elevation change. Most of the trail was in direct sunlight, I would recommend additional water. Also, following our hike and the more than thirty miles of off road driving to Fossil creek, our white Subaru needed a bath.
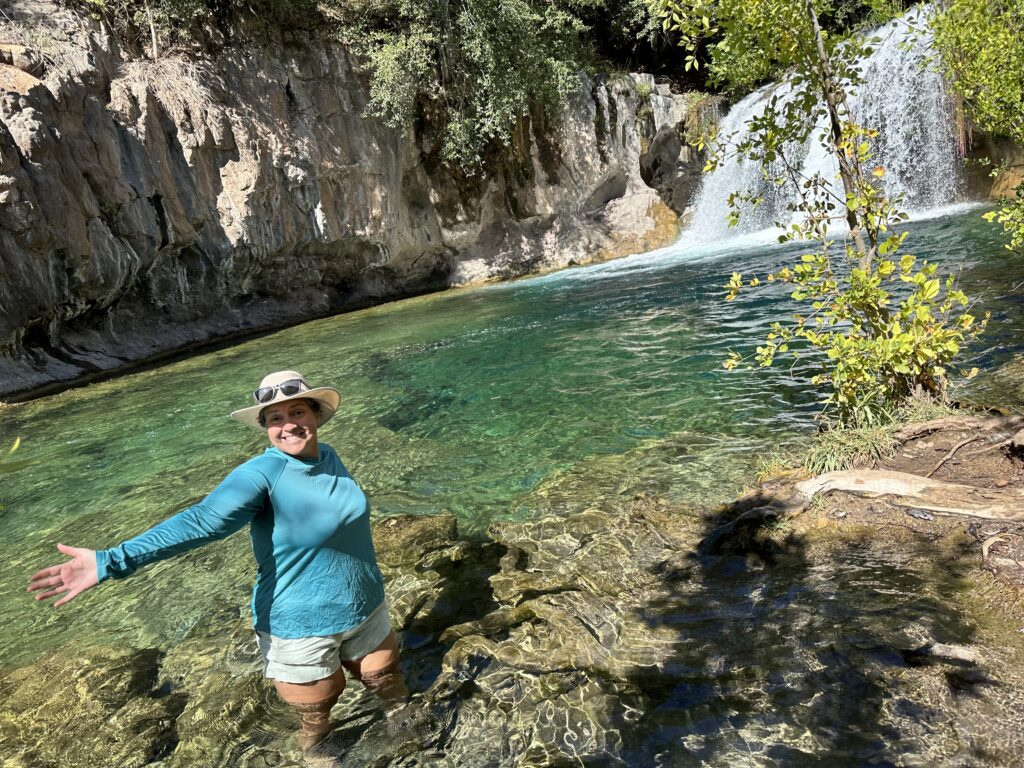
Bell Trail-The Crack – Rimrock, Arizona
The Crack at the end of the Bell Trail is one of the best swimming/jumping spots we have hiked to. It is a 6.9 mile out-and-back trail near Rimrock, AZ located in the Wet Beaver Wilderness Area. Parking is available off Beaver Creek Road and is free. The Bell Trail is easy to follow with under six hundred feet of elevation gain mostly in the last mile of the hike. There is a small amount of exposure in the second half of the hike, where there was lots of beautiful red rock traversing.
The crack was the first up close sighting of wet beaver creek, the clear bluish green water was incredible. The swimming and cliff jumping area was obvious as soon as we arrived. We quickly changed into our bathing suits and chose our first jumping location. I started at a lower level to verify the depth of the water, which we guesstimated was in excess of twenty feet at the current creek level. I was glad I did because, the water was so cold it took my breath away. It was wonderful!
Jess and I took turns jumping off different places along the crack and swimming in the creek. We were the first to arrive and many more people started to show up as we played. It was hard to accept that this beautiful place is in the middle of the desert.
Devil’s Bridge via Chuck Wagon Trail
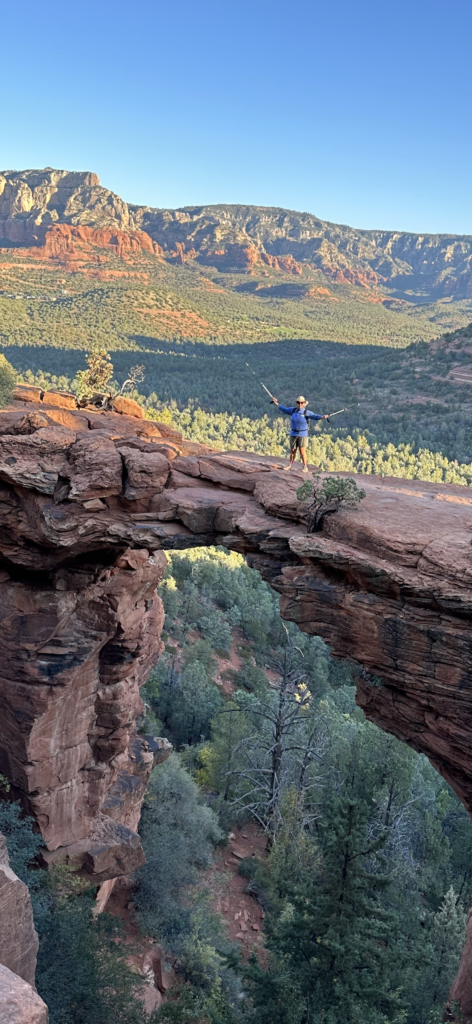
Devils Bridge via the Chuck Wagon trail is a 5.7 mile out-and-back hike with 728′ elevation gain. I would rate the hike as easy until the final 10-15% of the trail, where most of the elevation gain happens. We parked at the Dry Creek Vista Trailhead lot, which fills up quickly, there are no fees and the Sedona Shuttle is available.
We chose to hike the Chuck Wagon Trail to Devil’s bridge, there are many trail options and it is possible to explore other loops in the area. This is an iconic Sedona photo location. Expect large crowds everyday of the week, with a possible wait of several hours to take a picture on weekends. We chose a very early Wednesday morning hike.
By 7;00am we were standing on Devil’s Bridge taking our photos. There were only a few people at the top when we arrived and no line. Hikers were friendly and offering to take pictures of others. Our hike in took us less than an hour, this was our second visit to this beautiful spot. As more people continued to arrive, we decided to hike down to a lower viewing location to make room for others and enjoy a snack.
Cathedral Rock Loop via Templeton & Hiline Trails-Sedona
Cathedral Rock is an iconic Sedona Hike. We decided to avoid the crowded parking lot at the base of Cathedral Rock and instead park at Yavapai Vista. This parking area accesses many trails and allows multiple loop possibilities. We chose the Slim Shady Trail to Templeton Trail, and finishing with the Hiline Trail.
We hiked the loop counter clock wise and ascended the Cathedral Trail Spur when we arrived. I would rate the entire hike as moderate and the climb to the Cathedral saddle as difficult. The Cathedral Rock Trail is .6 mile one-way and gains 741′, and climbing hand over hand up a long crack area is required. The trail ends abruptly at the saddle, which allows access to incredible views on both sides of Cathedral Rock.
As with other iconic Sedona hikes we started early, took our pictures and headed down to continue our loop hike. The loop was my favorite part of the day. There were many surprises, including access to Oak Creek. The majority of the hike involved traversing a beautiful red rock single track trail with many different views of Cathedral Rock. We saw very few people after we left the Cathedral Trail area. We finished our hike with just over eight miles of hiking and 1400′ of elevation gain.
Sedona Airport Loop Trail & Vortex-Sedona
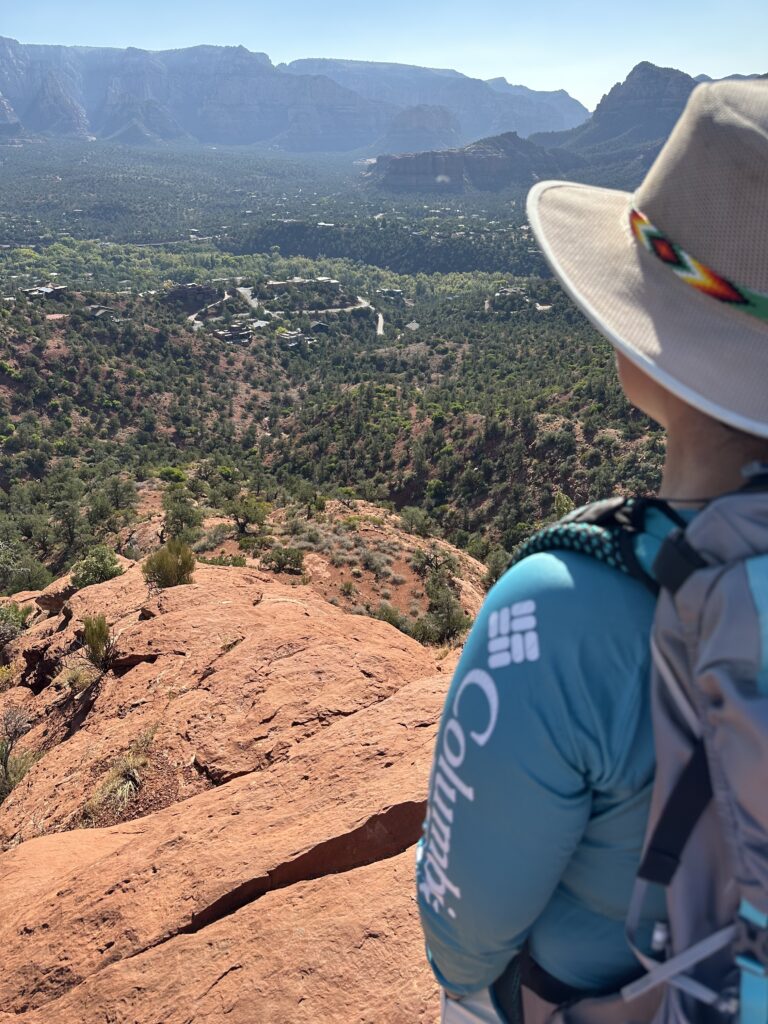
Many people refer to this trail as the Airport Mesa Trail. It is a 3.3 mile loop, which I would describe as easy with a small amount of exposure. We arrived early and parking was available at the small lower free lot on Airport Rd. at the base of the Vortex hike. There is an additional parking lot for a fee at the top of Airport Rd. with a .6 mile connector trail.
The loop trail allows a 360 degree view of Sedona as you traverse your way around. The trail only gains 429′ of elevation as you hike mixed terrain, which consist of red rock ledges and hard packed rocky surfaces. The eastern side of the trail has a few narrow areas with some exposure, which a person afraid of heights might not enjoy. It was a wonderful morning hike with very few people hiking the loop.
The majority of visitors are only hiking the very short climb to the top of the Vortex, which offers an incredible view for the effort. We took many pictures and enjoyed the people we met. You can watch our video of the hike at https://hikingmemere.com/video-of-the-week-hike-airport-mesa/
Bear Mountain-Sedona
Bear Mountain is one of Sedona’s most difficult hikes. We parked at the lot on Boynton Canyon Road across from the trailhead. A Red Rock parking pass is required, America the Beautiful Pass is also accepted. The trail is 4.9 mile long out-and-back with 2024′ of elevation gain. This was our second climb up Bear Mountain we first climbed it five years ago and enjoyed it.
The trail is strait up from the beginning with several steeper sections mingled in. There were beautiful “rock” highways and hand over hand climbing up hidden corridors. The texture of the rocks and variety of flora provided ample opportunity to enjoy the surroundings, masking the steepness of the hike. There are three false peaks and a significant descent into a canyon before reaching the true summit of Bear Mountain. You can watch our video of the hike at https://hikingmemere.com/video-of-the-week-hike-bear-mountain/.
Bell Rock & Courthouse Butte Loop-Sedona
Bell Rock and Courthouse Butte Loop trails have multiple parking areas, we parked at the Bell Rock Vista. Red Rock parking pass is required, America the Beautiful pass is also accepted. There are many small trails in this area, allowing for variations to any loop. We hiked 5.8 miles and 695′ of elevation gain, with the majority of that gain occurring during our climb up Bell Rock.
Most people only visit Bell Rock which is an iconic Sedona destination. We decided to hike the entire loop around Courthouse Butte and Bell Rock, it was a beautiful hike. The trail was easy to follow and easy to walk, we encountered very few people on the trail until we were close to Bell Rock. My favorite spot on the trail was an unexpected rock formation on the backside (opposite our parking area) of Courthouse Butte. It was a perfect place to sit and enjoy our lunch.
We arrived at the Bell Rock trail and followed the white dashes, which provided the easiest access to Bell Rock’s high point. The trail is a red rock scramble with many options. The end is when you decide you have climbed to your comfort zone. Bell rock steepens closer to the top and the exposure increases. Our hike down was more difficult than our ascent. Bell Rock is the attraction but, we preferred the experience and solitude the loop hike provided.
Chimney Rock via Thunder Mountain & Andante Trail-Sedona
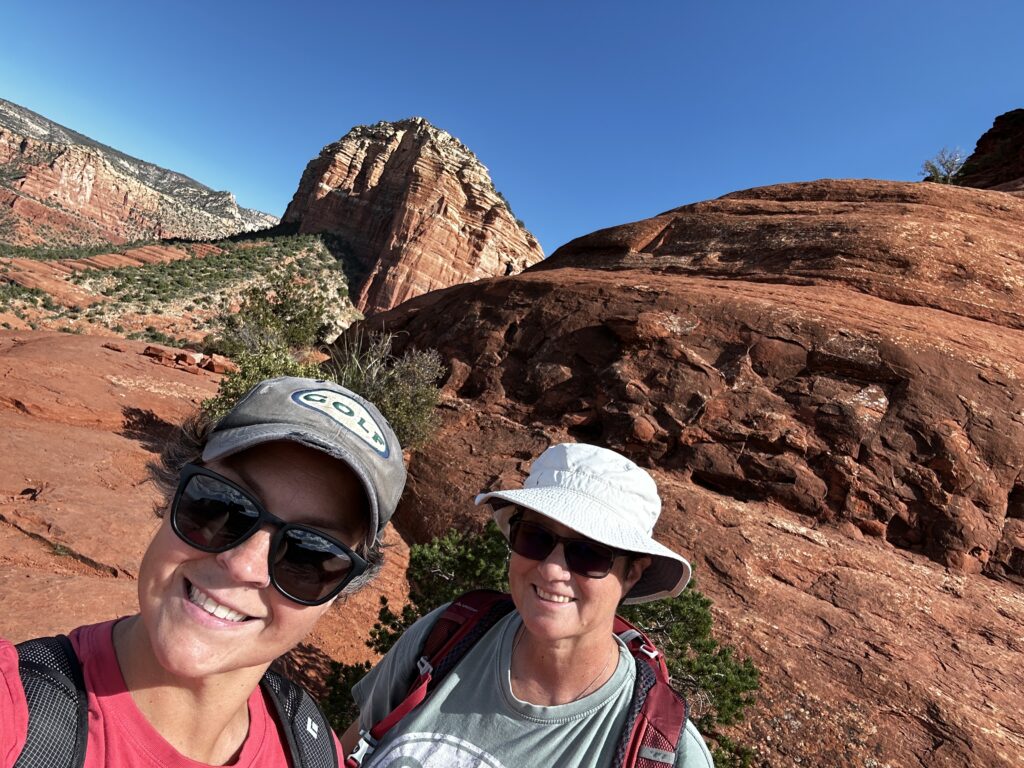
Chimney Rock via Thunder Mountain & Andante Loop allowed us to hike spur trails to the top of Little Sugarloaf and Chimney Rock. There are many trails in the area with multiple loop possibilities. We hiked a total of 6.7 miles which included exploring many trails. The All Trails app says the hike is 3.9 miles with 541′ of elevation gain. We parked for free at the Thunder Mountain Trailhead and plenty of parking was available at 7am.
We hiked the loop clockwise, the trail was easy to follow and well marked. One of my favorite part of the hikes was the spur trail up Little Sugarloaf. It was hard to follow and a bit of a scramble but it was short, and led to the rounded red rock summit, with 360 degree views of the surrounding area. We were the only people on the top, despite the many people hiking the various loops.
After another short distance we arrived at the Chimney Rock spur trail, which leads to the high point of Chimney Rock, this trail was much easier to follow. There was more elevation gain and some scrambling with a small amount of exposure. The view from the top was stunning and we had the place to ourselves. The remainder of the loop crossed over a high point on the trail, and then gradually circled around back to the parking lot. The variety of trails in this area provides options for many ability levels.
West Fork of Oak Creek Trail 108-Sedona

West Fork of Oak Creek #108 is a 6.5 mile out-and-back hike with 564′ of elevation gain. The trailhead is located at the parking area at Call of the Canyon day-use area. They charged us a $6 per person fee to enter, which included parking, the America the Beautiful Pass is not accepted. When we arrived around 7am and parking lot was almost full.
This is a beautiful canyon hike following the West Fork of Oak Creek. There are thirteen crossings of the creek, which means twenty-six total crossings. We were able to navigate all of them without getting our feet wet. I am glad I had my hiking poles for additional stability while hopping across the many nicely aligned rock “bridges”. The trail meandered through the beautiful steep walled canyon, and we were lucky to hike in October with the trees showing off their amazing fall colors.
The trail was busy, with a mix of hikers and photographers. The beauty of the forest and variety of plant-life combined with the colors of the canyon walls is what makes this an awesome hike. The trail ends at a point in the canyon where the walls close in and you can only continue if you choose to get into the creek. If you can only hike a few miles, I believe the experience will still be awesome!
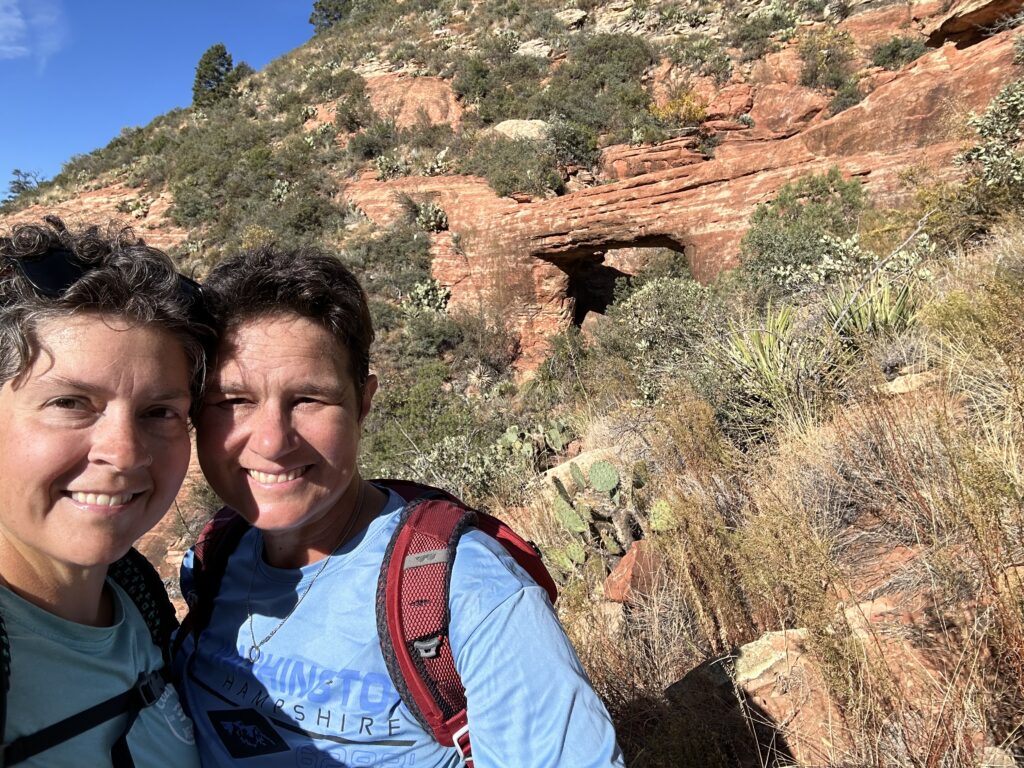
Boynton Canyon Trail including Subway Cave & Vista-Sedona
Boynton Canyon Trail, including Subway Cave and Boynton Canyon Vista Trails as well as walking distance from our car combined for about 8 miles of hiking and just over 1300′ of elevation gain. At 7am the parking lot was full. Fortunately near by street parking is allowed, as long as your vehicle is parked entirely off the pavement. We decided to put our legs in high gear and hike to the Subway Cave as quickly as we could and take the iconic pictures, visit the Sinagua ruins and leave before too many others arrived.
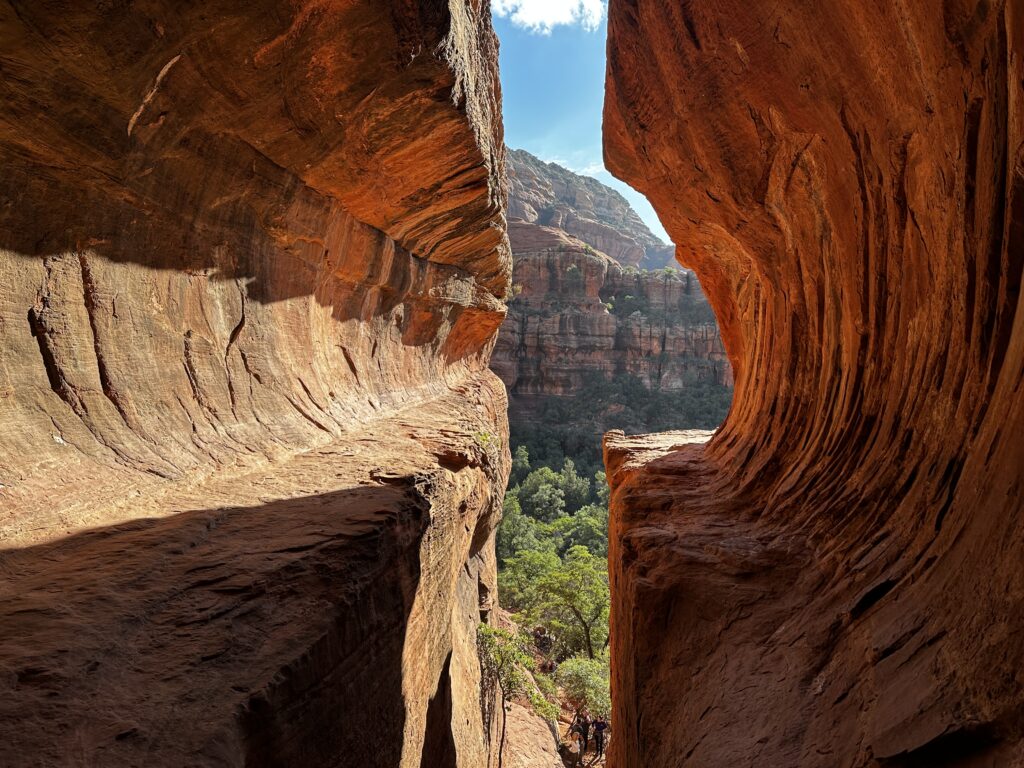
Subway Cave
We had only hiked a few tenths of a mile and we encountered many people stopped in the trail. We discovered there were javelinas blocking the trail ahead of us. I waited for everyone to take pictures and then started walking. I tapped my hiking poles on the rocks and the javelinas retreated into the trees, allowing us all to walk by. Subway cave is easy to find with the proper information. I read through many different trail descriptions, the consensus was to take the unmarked trail to the right exactly two miles from the beginning of the trailhead sign. This information was right on, the trail was easy to follow and became steeper closer to the cave.
When we arrived there were a handful of people exploring the area. Everyone was helpful even pointing out an easier scramble up to the cave level. Hiking to the cave is the easy part, climbing up into the cave and accessing the ruins is not for everyone. Once up to the cave level, there are very narrow cat walks allowing for exploration of the area. The area is very exposed and a fall could result in serious injuries or worse.
My favorite part of the cave was a ledge found on the ruins side of the area. We were the only ones there away from the many groups of people arriving. It was amazingly quiet and peaceful, that alone was worth the experience.
Boynton Canyon
Boynton Canyon is a moderate hike through a variety of trees and vegetation. Most of the people we encountered at Subway Cave do not climb into the canyon. Five years ago when we explored this area we were not aware of the cave and we only hiked to the canyon. It was a beautiful hike both then and now. In my opinion well worth the small amount of effort.
Boynton Canyon trail becomes steep and a little bit of a scramble at the end. A red rock slab, with a beautiful view is the end of the trail and provides the perfect place for a snack. Our hike out of the canyon was an easy walk with many photo opportunities. We hiked the Boynton Canyon Vista on our way out to the car. It was a very short hike up to the the vista, which offered 360 degree views of the area.
Vultee Arch via Sterling Pass-Sedona
Vultee arch via Sterling Pass is 5.1 mile out-and-back trail, with 2020′ elevation gain. It is a more difficult trail which begins on the left side of 89A several miles north of Sedona. We parked at a small parking area just before Manzanita Campground on the lefthand side of the road. Walking the short distance to the trail along 89A was the most dangerous part of our hike.
Vultee arch has two different approaches. One option is from Dry Creek 4 x 4 road, which requires a high clearance vehicle. Then a short 3.5 mile out-and-back moderate hike with 534′ of gain. Sterling pass is an out-and-back trail with a steep 1000′ plus climb which we would need to do twice. The access to the trail is from a main road and does not require an off-road vehicle. It was the trail for us. We quickly felt at home, like we were hiking in the White Mountains of New Hampshire.
The Climb
Switchbacks ascending the high pass were unrelenting. Jess and I were joking that we climbed straight up six feet, then traversed twelve feet while losing three feet of the elevation we had just gained. This continued until we reached the saddle. The beauty of the high canyon walls were impossible to mistake for anywhere but Sedona. We descended into the canyon on our way to the arch, knowing we would need to re-trace our steps and climb to the saddle again.
We quickly reached the spur trail to Vultee arch, in just a couple of tenths of a mile we could see it rising up above the canyon floor. There was a rough path to the arch protected by several different varieties of thorny plants, we were “bitten” many times on our ascent. I positioned myself on a ledge with a good view and waited for Jess to continue her climb. Once she arrived at the arch, we decided it was not the best idea for her to climb out onto the narrow ledge. We were over three miles from any help in any direction, with no cell phone signal, and no ropes for protection.
We snapped our pictures, enjoyed a snack, and began our ascent back up to the top of the saddle. Just below the saddle we began to meet more hikers with many questions about the hike. We provided the details of our hike and offered encouragement to all. It was a beautiful day.
Mt. Wilson via North Wilson Mountain Trail-Sedona
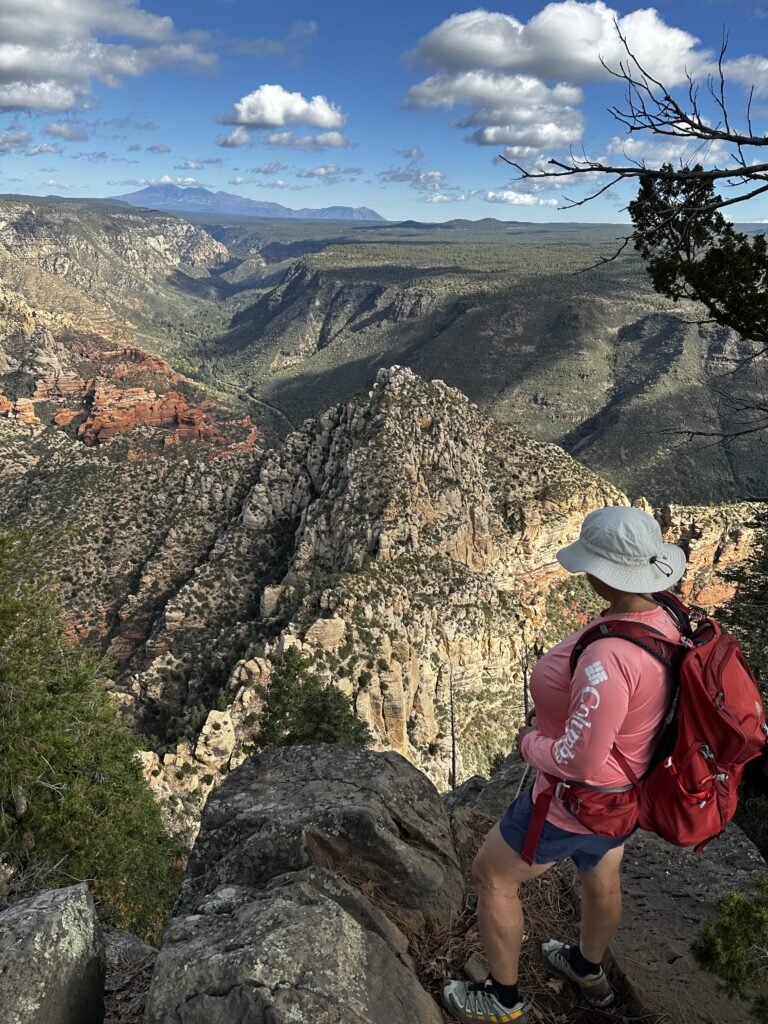
Mt Wilson has two separate starting points and we chose the North Wilson Mountain Trail. It is Sedona’s highest peak with a 2634′ elevation gain and just over 10 miles of hiking. We parked at the Encinoso picnic area, which requires the Red Rock pass, our America the Beautiful Pass was accepted. This hike was not what I was expecting.
I read many trail descriptions and most rated this as a difficult hike with a lot of switchbacks. For a short distance to the first bench that was true. The term bench was one I was unfamiliar with. I looked it up while writing this piece and it describes a flat area surrounded by steep vertical terrain. This definition explained the easy traverse to the official first bench sign. From there the trail once again began a steady climb up many long switchbacks.
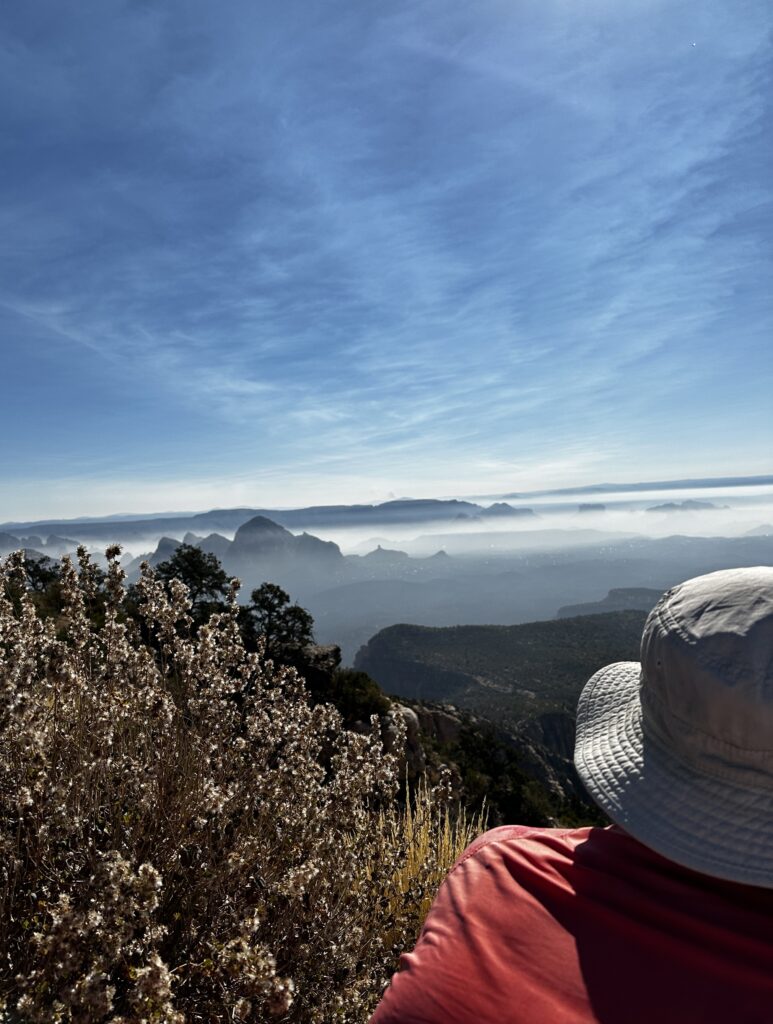
In no time we reached the second bench, which is the top of the mountain. There are two outlooks separated by a couple miles of fairly easy trail traversing the bench. We hiked to the Oak Creek Canyon lookout first, a longer route and less popular. It was Awesome! Mt. Humphrey and the San Francisco Peaks in Flagstaff were visible in the distance. We could also see the saddle of Sterling pass, which we hiked yesterday.
We enjoyed our lunch alone in this beautiful place, and then began our journey back across the bench to the Sedona lookout on the southern end of Mt. Wilson. The Sedona lookout was as spectacular, presenting a kaleidoscope of colors. The canyons, peaks, mesas, buttes, and inspirational places we visited throughout the last month were all there before us. Unintentionally, we had chosen the perfect hike to complete our time in this beautiful place!
Another beautiful and adventure full hike. The scenery is just gorgeous. Thank you for taking me on the hike like you, even though I didn’t leave my house.
You’re welcome! Glad you enjoyed following along.